JB Water and Air
With the holidays right around the corner, you may be in for some company. Make sure your bathroom faucet is up to the task. Whether it just needs a quick and easy update, or you have an issue, replacing it is a great way to enhance the look of your bathroom. JB Water can help.
First, you need to choose the faucet. Make sure you take note of your current faucet so that you choose the right type. There may be one hole in your counter top, or there may be three. If you’re just replacing the faucet, make sure you choose the same kind. Now you’re ready to get started.
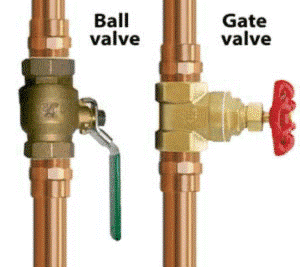
An important precaution before beginning any plumbing project is to find the main shut off valve to your home and make sure it is in good working order.
Remove the old faucet
1. Turn off the water supply. The valves are typically under the sink. It is not uncommon for very old valves to break or begin leaking when you attempt to turn them off. Should anything go wrong, you will want to close the main shut off valve in a hurry.
2. Disconnect the supply lines from the faucet. Use a basin wrench if you can’t reach the connections with your hands.
3. Disconnect the sink drain lift rod, and then remove the nuts from under the faucet.
Remove the Drain
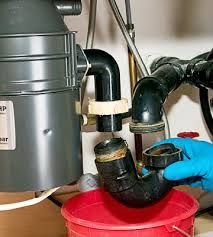
1. Unscrew the slip nut on the P-trap. Put a bucket underneath to catch water in the trap.
2. Disconnect the drain flange from the tailpiece. It should unscrew.
3. Clean around the old drain and faucet holes. Mineral spirits can help remove old silicone sealant.
Install the New Faucet
1. Follow the manufacturer’s directions for specific installation instructions. Most installations begin with installing the gasket on the bottom of the faucet. Some require sealant or plumber’s putty. Then put the faucet through the mounting holes in the sink and tighten the mounting nuts.
2. Not all faucets come pre-assembled so you might have to attach the handles. It’s easy. Slip the guide ring onto the bottom of the handle, position it on the faucet base, and secure with the setscrew. A setscrew is the tiny screw on the underside of the handle. Your faucet probably came with a hex wrench to tighten it.
3. Next, move on to the drain. Screw the nut all the way down on the drain body and push the gasket over it. Some gaskets are threaded and simply screw into place.
4. Apply just a little bit of silicone (some manufacturers recommend plumber’s putty) under the flange. Position the drain body on the bottom of the sink — making sure the pivot hole is facing the back — and screw the flange on from the top side.
5. Underneath, tighten the nut and gasket. On the top, use mineral spirits to clean up any excess silicone.
6. Install the drain rod next. Unscrew the pivot nut on the drain body, insert the horizontal rod through the hole in the stopper, and replace the nut. Push the horizontal rod down and secure the lift rod to the strap with the screw. Test the lift rod.
7. Reconnect the supply lines from the faucet to the hot and cold water shutoff valves. Be careful not to over-tighten the connecting nuts. Moderate pressure is all that is necessary.
8. Flush the faucet by removing the aerator. This gets rid of debris or sediment in the faucet. Some faucets include a handy little tool to unscrew the aerator. When you’re done, keep it inside your vanity or with the rest of your tools. Turn on the hot and cold water for about a minute. Check all the connections for leaks and re-tighten if necessary. Screw the aerator back on and you’re done.
Additional faucet installation details for DIYers can be found at the websites for Lowe’s and Home Depot, complete with pictures and videos.
If all this proves to be more than you have time or energy to take on, give us a call and we can take care of it for you! We know you want everything looking nice and working great when you have guests; let us help you make that happen!
The post
Changing A Bathroom Faucet Made Easy appeared first on
JB Water.