JB Water and Air
A p-trap is that curved pipe that you see beneath any sink. P-traps are designed to prevent the backflow of sewer gases from passing into the home. A P-trap can trap debris that has drained from the sink, which can restrict the flow from the sink. So, why is removing P-traps important?
Because this bit of plumbing ingenuity does indeed trap items, sometimes you need to remove P-traps in order to dislodge whatever is clogging up the pipe. If the P-trap becomes only slightly clogged, then you will have slow drainage in the sink. Luckily, the steps needed to remove P-traps are easy to follow for most homeowners.
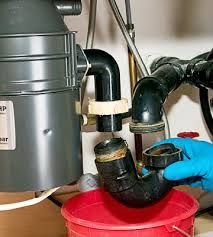
In order to remove P-traps, you should only need a rag and a bowl. First, though, clear out everything from underneath the sink so you have better access to the plumbing. If you have plastic plumbing (PVC), then don’t use a pipe wrench. You should be able to use a rag to gain leverage on the P-trap coupling nut (the piece that connects one piece of pipe to another). Grip the pipe with your other hand so you don’t snap the pipe. Turn the nut counterclockwise until it’s loose, then turn the other coupling nut and remove the P-trap. Make sure to keep the bowl underneath the P-trap to catch the water that will escape from the pipe.
Clean the P-trap thoroughly with a large bottle brush and do the same to each end of the pipe that the P-trap connects to. A hose end sprayer outside can also work well for cleaning. The steps to replace P-traps are just as easy as when you remove P-traps, though sometimes it can be a bit tricky to line up the threads on the couplings at first. Once re-connected, run some water in the sink to see if cleaning the P-trap resolved your slow drainage problem and to make sure your connections aren’t leaking. If you still have issues, contact a reputable plumber to help resolve the issue.
The post Removing P-Traps appeared first on JB Water.
